
Enable Inbound Connectivity for Odoo
Documentation is currently available in English only.
On this page
Inbound connectivity is the optional path for an import that starts in DataInlet. DataInlet connects to Odoo to inspect the target and write the result as a configured Odoo user.
You do not need inbound connectivity to use Import with DataInlet from an Odoo form, list, or kanban view. That standard workflow starts in Odoo and is covered by the Admin docs.
What inbound connectivity adds
| Import starts in | Direction | Odoo identity |
|---|---|---|
| Odoo | Odoo connects to DataInlet | The employee who starts the Inlet |
| DataInlet | DataInlet connects to Odoo | The configured DataInlet execution user |
Configure inbound access through the same database-wide connection dialog.
Requirements
Inbound connectivity requires:
- the optional DataInlet Inbound API
(
datainlet_odoo_server) addon and its DataInlet Foundation dependency installed; - system-administrator access to configure the connection;
- an Odoo URL that the connected DataInlet host can reach; and
- an active internal DataInlet execution user with a primary company and the access required for the intended imports.
Get the addons from Odoo Apps and select the 18.0 or 19.0 version that matches your Odoo server.
For DataInlet Cloud, the Odoo URL must be publicly reachable. An on-premises
DataInlet deployment only needs network access to the URL. Use an http:// or
https:// URL that resolves to this Odoo instance.
Enable inbound connectivity
Open Settings → General Settings → Integrations → DataInlet → Connect DataInlet. With DataInlet AI Import installed, you can also use Settings → DataInlet → Configuration → Connection.
Select Enable DataInlet → Odoo connectivity. This reveals the Inbound connectivity tab.
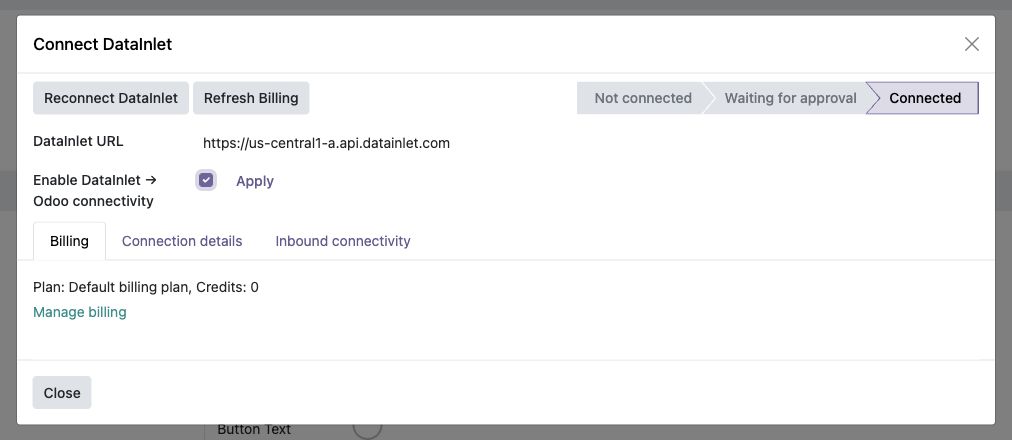
The checkbox reveals the Inbound connectivity tab.
In the tab, set:
- Public Odoo URL to the address DataInlet can reach; and
- DataInlet execution user to the Odoo user whose permissions should govern imports started from DataInlet.
If you are connecting the database for the first time, complete the authorization steps in Connect DataInlet. Odoo requires the inbound values before starting that authorization and validates the inbound connection after approval.
If the database is already connected, select the inline Apply action beside the checkbox. Changing the checkbox, URL, or execution user alone does not change the active inbound connection. Apply validates the new settings before replacing the previous inbound access.
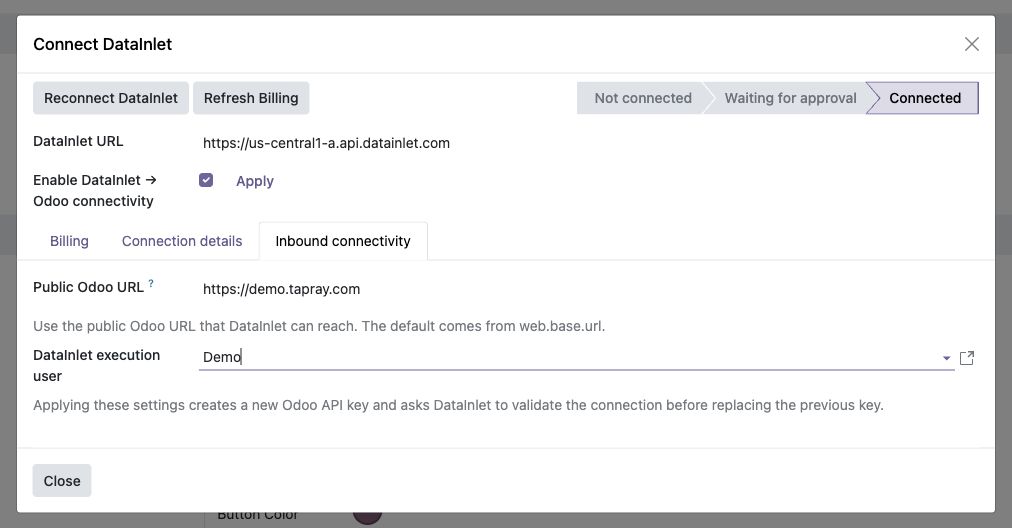
This demonstration uses a publicly reachable Odoo instance and the Demo business user. Select Apply after setting the URL and execution user.
Return to New Inlet
Return to New Inlet in DataInlet. If the Odoo destination offers Recheck, select it to check the updated connection. For newly enabled inbound access, reopen New Inlet to load the updated destination list.
When the destination shows Available for direct import from DataInlet, select it to continue. If it remains unavailable, verify the public Odoo URL and execution user, apply the corrected settings in Odoo, and check again.
Execution permissions
The DataInlet execution user is a real Odoo security identity, not a label. Odoo access rights, record rules, company access, and validation still apply to every inbound operation.
Use a dedicated internal user when practical and grant only the models and companies needed for the imports that may be started in DataInlet. Changing the execution user affects future inbound operations; existing Inlets keep their execution identity.
Update or disable inbound connectivity
Return to Connection, change the URL or execution user, and select Apply. Odoo keeps the previous inbound access unless the replacement is validated.
To disable inbound connectivity, clear Enable DataInlet → Odoo connectivity and select Apply. This does not disconnect Odoo from DataInlet and does not affect imports started from Odoo.
If the dialog reports DataInlet → Odoo setup failed, open Connection details for the error. Correct the reported issue, such as the URL or execution user, and select Retry inbound connectivity. If the inbound path is no longer required, clear the checkbox and select Disable inbound connectivity. In this recovery state, that button replaces Apply.
If the optional addon has been removed, the dialog instead reports that inbound connectivity is unavailable. Reinstall DataInlet Inbound API to restore it, or select Disable inbound connectivity to remove the saved inbound setup.